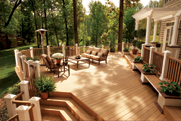
 Decks of all shapes, sizes and design can become an oasis for homeowners who want to enjoy their time outside. A place where they can while away the afternoon or weekend in peace, usual with a warm sun offering comfort.
A place where they can set up deck chairs or a table and sip drinks as the day lazily passes, or enjoy barbecue fresh from the grill with a block party or a family get together.
In order to provide years of necessary comfort, most decks require you do a little care and maintenance each year.
Give us a call if you are looking to create a perfect deck or sunroom, our number is 217-369-2083.
Check for damaged boards
The boards that make up the surface of your deck and steps are subject to all kinds of stress and usage. Over time, they will wear out or potentially rot depending on the type of wood or composite used in your deck. If you don’t check for and replace damaged boards each year, you could be setting yourself or your family up for an injury.
1. Examine the surface boards of your deck. Look for signs of stress, like excessive curling, cracking, rotting, or severed boards. Any you find will need to be replaced.
2. Measure the damaged board.
3. Purchase a replacement board. Your local lumberyard or hardware store (if they carry wood) should be able to help you. Pressure treated wood is preferable, otherwise you’ll need to seal the wood yourself (which can be done before or after installation).
4. Remove the damaged board. If nails were used to secure the board, you will need a small nail puller or a hammer to pry the nails out. Use a small block of wood for leverage. The block of wood will protect the boards that don’t need to be replaced. If screws were used to secure the damaged board, a screwdriver or drill (with screwdriver bit) should do the trick. Also, wear work gloves when lifting the board out to prevent splinters, and it’s recommended to wear eye protection if the wood is particularly difficult to remove or if there is much dust.
5. Cut the new board to fit. Make any adjustments necessary to the new board so it will fit in the space left by the damaged board. A handsaw or electric saw can help you cut the new board down to size, make sure to make any notes on how the wood expands or contracts during the seasons.
6. Test fit the new board. Lay the board in its spot. Make sure it fits properly and that you like the way it looks.
7. Attach the board. First, drill guide holes for the nails or screws to make sure they will properly adhere to the support beams. Next, add the nails or screws. For decks, screws are recommended since they won’t pop out when the wood expands and contracts with the changing weather conditions.
8. Apply water sealant to your deck to help protect it (if the wood wasn’t pre-treated). Follow the directions that come with the sealant.
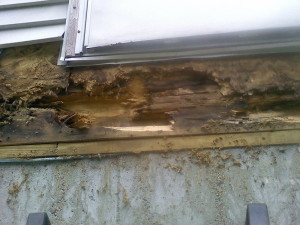 Check structure supports for signs of insects or animal damage
The structural supports keep your deck up and in place. Underneath the surface of the deck, where the structural supports are located, is a perfect place for insects to flourish and animals to take up residence. The problem is, they can damage or destroy the supports, which can make your deck unusable and dangerous.
1. Inspect your deck’s structural supports. Visually inspect the area underneath your deck with the aid of a high-power flashlight. Look for any signs of animal or insect damage, like chewed supports, cobwebs, brittle wood, etc.
2. If you find any signs of insects or insect damage, schedule a visit from a pest-control expert. In fact, you may want to set up a regular schedule with him or her to prevent insects from ever becoming a problem.
3. If the damage appears to be animal related, consider adding lattice or some other barrier around the edges of your deck to keep critters out from under it.
Check for popped nails, loose screws, and bolts on decks
Nails, screws, and bolts hold your deck together. If they come loose or pop out (a consistent problem with nails), then the deck boards could come loose or the deck itself could partially collapse.
1. Inspect all the nails, screws, and bolts that hold your deck together. You will need to tighten any that are loose or that have popped out. Wearing work gloves is recommended.
2. Nails that have popped out need to be driven back in. Use a hammer and pound them back into place.
3. Screws that have worked their way out need to be twisted back in place. Use a screwdriver or drill (with screwdriver attachment) and tighten them. Be careful not to strip the screws. If you do, you will need to make a trip to your local hardware store and purchase a slightly larger screw as a replacement.
4. Bolts are the only one of the three that don’t rely on the wood to hold them in place. Use a wrench or two (depending on how loose the bolt has become) to tighten the bolt.
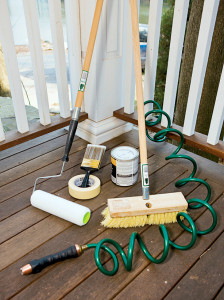 Cleaning your deck or outdoor living area
Dirt, grime, mildew, or mold can build up your deck over the course of the year. Not only can they diminish the look of your deck, they can also make it slippery and, in the case of mold and mildew, damage your deck.
1. Visually inspect your deck. Look for dirt, grime, mildew, and mold. Even if none are readily visible, you should still wash your deck or sweep it.
2. Wash the deck. A power-sprayer is an easy way to remove the dirt and grime. However, for mold and mildew, or if you don’t have a power-sprayer, use warm, soapy water and a scrub brush. Thoroughly scrub the surface of the deck. Make sure you remove all mold and mildew you find.
3. Rinse the deck. Use a water hose to wash away the soap and water along with any loosened dirt, grime, mold, or mildew.
Re-seal or re-stain your deck
Once of the biggest ravages your deck can face is moisture. In order to keep your deck in good shape for years to come, you need to re-seal or re-stain it each year depending on the product that was used to install your deck, give your deck builder a call and ask them what they recommend.
1. If you haven’t already, clean the surface of the deck. A power-washer is an easy way to do this. If not, you can also use a large scrub brush and soapy water. You can usually rent or buy a power-washer at your local hardware store.
2. Let the deck dry.
3. If the deck already has a finished or sealed surface, remove the finish or seal with a remover/stripper that you can purchase at your local hardware store. Follow the directions on the package.
4. Purchase new sealant or stain. Make sure any stain you choose is meant for the outdoors and can protect the wood from the elements.
For following steps, you should wear a dust mask or respirator to prevent the inhalation of particles and/or fumes:
5. Sand the deck. It must be smooth before you can refinish it. A medium grit sandpaper will probably work for most decks. Remove any sanding dust that may be left behind.
6. Apply the finish or sealant. If you’re using a colored finish, make a test spot first to see if the color you chose is indeed the color you want. Using a foam brush, staining pad, or nylon/polyester brush, apply the stain or sealant with the grain of the wood. For colored finishes, work quickly and don’t stop in the middle of the job for break. Doing so can cause the finish to dry uneven, leaving you with streaks.
7. Let the stain or sealant dry. This should take approximately two hours (depending on humidity and temperature).
8. Add a second and possibly third coat to enhance the protection of your deck.
Need some help or need a new deck? Call us, 217-369-2083.